
EVENT: FOODIEMONDAY/BLOGHOP
THEME: #244 SNACKMANIA
FoodieMonday/Bloghop Theme
Many countries are still under lockdown or curfew while some are planning to open up malls, restaurants, shops but with limited people allowed in these places. This week Renu who blogs at Cook with Renu, suggested that we make snacks which can be stored at least for two weeks if not less. Truthfully, most snacks in my home don’t last beyond two weeks besides chevdo.
Snacks
With families at home with this Stay Home Be Safe that everyone in the world is practicing, more food is consumed. Especially when you have kids at home, they constantly need something to snack on. For many its not easy to get fresh fruits and vegetables all the time. So most of the time we have to resort to other snacks that do not perish easily.
What are Snacks?
Snacks are small meals that one has in between main meals. These snacks can be ones that need to be consumed immediately like fritter, sandwiches, cut fruits, etc. Then there are those that last longer like cookies, crackers, crisps (chips), tortilla chips, etc. In that respect the Indian Sub Continent offers a huge selection of snacks or munchies as they are sometimes referred to. Right from Chedvo (Chevda), Ganthia, Sev, Mathia, Fafda, Mathri, Farsi Puri, Chakri, Sakapara, etc. The list is endless.
Check out some Snacks that can be stored for at two weeks or more and consumed:
- Extra Flaky Farsi Puri
- Khakhras
- Masala Farsi Puri
- Baked Mathri
- Chakri
- Baked Sakarpara
- Poppy Seeds and Sesame Seeds Crackers
- Besan Ke Namkeen Sev by Renu
- Knäckebröd or Crispbread by Renu
- Rice Flour Chocolate Chip Cookies
- Besan Nankhatai (Chickpea Flour Cookies)
- Wheat Orange and Oat Cookies
Snacks and Memories
My mum would make snacks often for our huge family and I remember helping her. Back then snacks were never bought ready made as we can do nowadays. Peel potatoes for the chevdo, help her bake cookies, roll and cut small slits on farsi puri, help her to smear mixture of flour and ghee for the flaky farsi puri. When my kids were growing up, they loved chevdo, sev, chakri…yes must have made tonnes and tonnes of those along with farsi puri.
What I made for the Snackmania Theme – Sourdough Grissini
As you may have noticed, I’m a bit more partial to healthier snacking options. Having said that Chakri, Farsi Puri and Cookies are my weakness. I love snacking on them. Hubby loves Chevdo. For this theme I chose to make a baked snack that can be stored for over two weeks. Initially, I decided to make grissini or breadsticks with yeast but since I’ve started the process of making sourdough starter, I have quite a bit of discard. I hate throw the discard away so decided to use that instead.
What is Sourdough Starter?
We all know that one requires yeast to bake a bread. Sourdough starter is a mixture of flour and water which is allowed to ferment at room temperature so that it ‘catches’ the wild yeast that exists in our surroundings. This helps the mixture to ferment. Some of the fermented mixture is discarded and the remaining fed again with more flour and water. This process which takes about 5-7 days helps the mixture to develop the characteristic sour taste that we find in sourdough breads and other sourdough products. Best place to learn how to make a sourdough starter is to visit King Arthur Flour Website.
What is Grissini?
Grissini is the Italian name for breadstick. Also known as grissino or dipping sticks, they generally are pencil thin. This should not be mistaken with the breadsticks that one gets at Dominoes,Pizza Hut or Olive Garden. Grissini are thin, crisp, dry baked bread which originated in Italy. These sticks are perfect for snacking on or to serve with a dip or even with a soup. The flavors of grissini are plentiful. Aniseed, cumin seed, herbs, caraway, cheese, sesame seeds, turmeric, sea salt, paprika, garlic, etc are some that I can think of.
Ingredients required for Sourdough Grissini
Fed or Active Sourdough Starter – the discard is fed and allowed to ferment overnight.
Flour – I used a mixture of both plain and wheat flour.
Salt – any salt of your choice
Flavoring of your choice – I chose to use cumin seeds.
Warm Water
Oil or butter
Dietary Tips:
- Vegan
- Kids Friendly
- Egg free


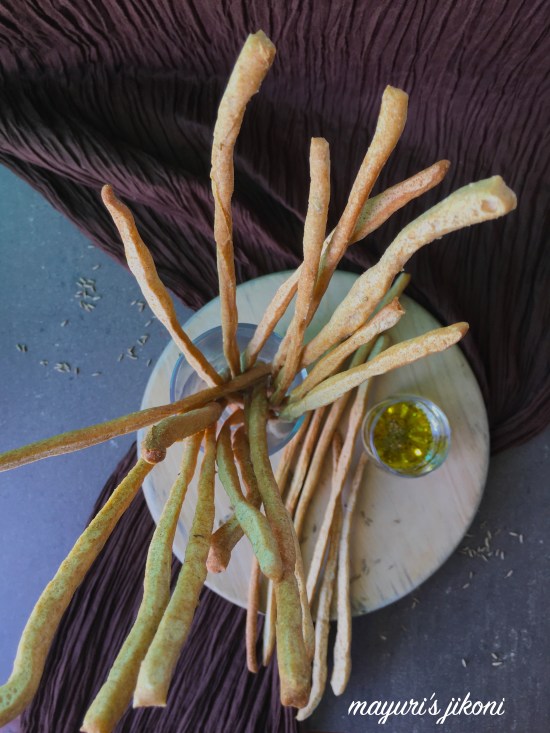
SOURDOUGH GRISSINI
Recipe Source: Doves Farm
For the Sourdough Starter:
25g sourdough starter, room temperature
50g wheat flour
75ml warm water
For the Grissini/Breadsticks:
150g fermented sourdough starter (that is the whole of the above fed starter)
150g wheat flour
50g plain flour
75ml warm water
½ tsp salt
1 tsp cumin seeds
2 – 3 tbsp olive oil
Ferment or make the Sourdough Starter ready:
- Mix the sourdough starter, water and flour in a glass jar or container.
- Mix it well, I prefer to use a fork.
- Cover and let it ferment in a warm place overnight.
- After 6-8 hours the starter should be creamy and with bubbles.
- To test if it is ready, drop a bit of the sourdough in a cup of water. It should float.
Prepare the dough for the Sourdough Grissini:
- Mix the flours, salt and cumin seeds in a bowl.
- Add oil and rub it into the flour.
- Add both the water and fed sourdough starter.
- Bring the dough together.
- Dust the worktop with some flour.
- Knead the dough for 5-10 minutes till you have a smooth dough.
- Grease a bowl with oil. Rub oil over the dough too.
- Place the dough in the bowl.
- Cover the bowl with a lid or cling film.
- Leave the bowl with the dough in a warm place to ferment for 3 hours.
- Deflate the risen dough gently.
- Dust the work top with some flour.
- Bring the dough together into a ball.
- Grease baking trays with some oil.


Two ways to prepare the grissini or breadsticks:
Using a pizza cutter:
- Roll out the dough into a rough rectangle about 10″ X12″
- Using a pizza cutter, cut the rectangle into thin strips.
- Carefully place the strips on the baking tray, leaving a little gap between each.

Rolling:
- Roll the risen dough into a long rope.
- Using a sharp knife cut into small slices, about the size of a walnut.
- Using very little flour, roll each piece into a long rope that fits in your baking tray.
- Though time consuming I found that this method is better.

Second Fermentation:
Place the trays in the oven (not switched on) and let the cut strips ferment for one hour.
Baking:
- Remove the trays from the oven.
- Preheat the oven to 180ºC.
- Bake the breadsticks for 10-12 minutes till they begin to turn light golden brown. Be careful not to burn them.
- Remove the breadsticks or grissini from the tray and let them cool on a wire rack.
- Store in an airtight container.
Tips:
- Roll the dough out into thin sticks.
- Make sure they don’t get burnt.
- If the rolled breadsticks are a bit thick, baking time will increase.
- Make sure you store grissini in airtight containers.
Pin for Later:


A little request:
If you do try this recipe then please either
- add a comment below,
- send a picture to my email mayuri.ajay.patel62@gmail.com
- tag me as #mayuri_jikoni on Instagram
- or tag me on Twitter as #Mayuri1962